How to Keep a Dog House Cool in Summer: 7 Proven Methods (From DIY to AC)
Key Takeaways
- Standard 5,000 BTU window AC units will short-cycle and fail in uninsulated tiny spaces; proper insulation and correct BTU sizing are essential for active cooling.
- Shade and reflective roof barriers can lower interior temperatures by up to 20°F before you ever plug in a fan or air conditioner.
- High humidity disables a dog’s panting mechanism, making mechanical air movement or AC mandatory in states like Florida, Texas, and the Deep South.
- Heavy plastic door flaps trap body heat and humidity; removing them during summer instantly improves cross-ventilation.
Table of Contents
During peak summer months, an unventilated dog house sitting in direct sunlight transforms into a thermal trap. Dark roofs and plastic walls absorb raw solar radiation, pushing interior temperatures up to 120°F—far hotter than the outdoor air.
For dogs living in hot regions across the US, an overheating shelter isn’t just uncomfortable; it is a direct hyperthermia hazard.
Knowing how to keep dog house cool requires looking beyond basic tricks like tossing an ice pack onto the floor. You need a practical strategy that combines thermal insulation, airflow physics, and safe climate control. This guide covers passive cooling hacks, active ventilation systems, and expert veterinary advice to keep your dog safe and comfortable all summer long.
1. Canine Heat Physiology: Dry Heat vs. Humidity
Before modifying your dog house, you must understand how dogs cool themselves down.
According to veterinary authorities like the American Veterinary Medical Association (AVMA) and VCA Animal Hospitals, dogs do not cool off by sweating through their skin like humans do. Instead, they rely on two main mechanisms:
- Evaporative Panting: Air moves rapidly over the moist tissues of the tongue, mouth, and upper respiratory tract, evaporating moisture and carrying away core body heat.
- Convective Contact: Dogs press their thinly furred bellies, inner thighs, and paw pads against cool surfaces to transfer heat out of their bodies.
Dog Cooling Efficiency: Dry vs. Humid Summer Heat
| Feature / Factor | 🏜️ Dry Climate (e.g., AZ, NV) | 🏝️ Humid Climate (e.g., FL, TX) |
|---|---|---|
| Air Condition | Dry air absorbs moisture quickly. | Air is already saturated with water. |
| Panting Process | Moisture evaporates rapidly from the tongue. | Saliva cannot evaporate off the tongue. |
| Cooling Effect | Highly Effective (Body temperature drops) | Ineffective (Heat stays trapped in the body) |
| Primary Danger | Rapid dehydration and burned paws. | Fast-onset heatstroke and respiratory distress. |
According to the American Kennel Club (AKC), a healthy dog’s normal body temperature ranges from 101°F to 102.5°F. When body temperature rises above 103°F, hyperthermia begins. At 105.8°F, classic heatstroke sets in, which can cause permanent organ damage or brain swelling within minutes
The Humidity Bottleneck
Panting requires dry air to work. Dogs do not sweat through their skin; they rely on respiratory evaporation—speeding up their breathing to 200–400 breaths per minute to circulate air over a wet tongue. However, the weather significantly dictates how well this system functions:
- Below 35% Humidity: Evaporation is fast, and the dog cools down efficiently.
- Above 60%–70% Humidity: The air is saturated with water vapor, and a dog’s core temperature rises rapidly even in moderate heat.
- Above 80% Humidity: Evaporative cooling completely ceases, making panting entirely useless.
Because of this bottleneck, a muggy 80°F day in the American South or Midwest can be far more dangerous than a dry 95°F day in the desert. In humid climates, simply providing shade is a myth—you must introduce active air conditioning or dehumidifiers to lower the dew point, alongside high-velocity fans to force air displacement.
2. Site Selection & Shade Strategies (The “Double Roof” Method)
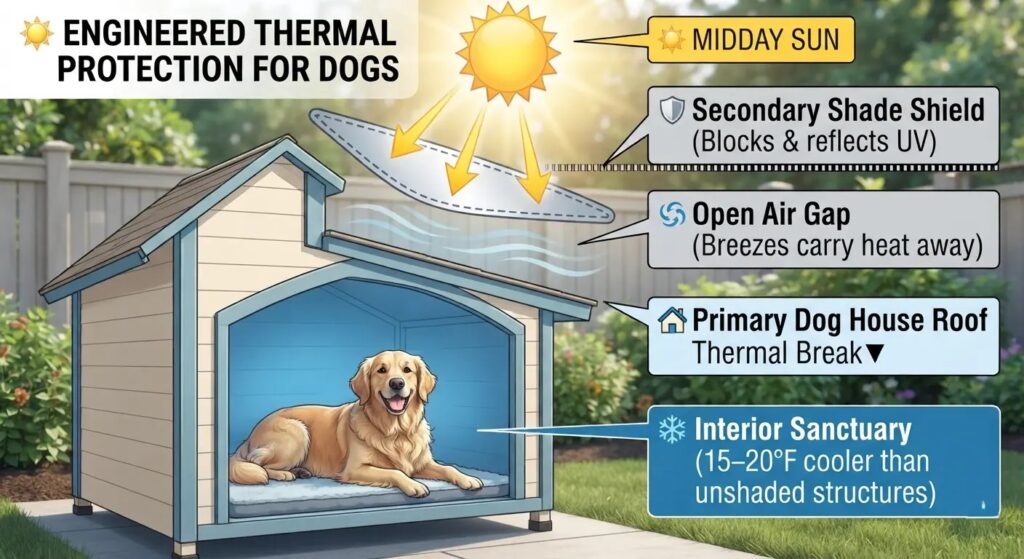
The fastest way to prevent heat buildup is to block solar radiation before it strikes the dog house. Dark shingle roofs act as thermal sponges, absorbing intense UV rays and radiating trapped heat directly down into your pet’s living space.
By installing an elevated secondary barrier, you create a dedicated buffer zone that neutralizes solar radiation.
How to Implement
- Position for Shade: Move the dog house to the north or east side of your home, garage, or barn. This provides total shade during the hottest afternoon hours (12:00 PM to 5:00 PM).
- Build a Double Roof: Construct a secondary shade shield 4 to 6 inches above the actual dog house roof. Use UV-treated plywood, corrugated vinyl, or high-density polyethylene (HDPE) shade sails.
- Maintain Open Airflow: Keep all four sides of the 4-to-6-inch air gap completely open. This allows cross-breezes to instantly sweep away the trapped heat before it transfers downward.
- Apply Reflective Roof Paint: Paint dark roofs with white elastomeric reflective roof paint. White coatings reflect 85% to 90% of solar radiation instead of absorbing it.
Pros, Cons, and Costs
- Pros: Highly effective solar defense. Permanent temperature reduction. Zero ongoing electricity or maintenance costs. Extends the lifespan of the primary dog house roof by shielding it from UV degradation.
Cons: Requires physical yard space. Demands minor structural assembly, tool use, and periodic hardware inspections.
Cost: $0 (repositioning the shelter) to $55 (purchasing elastomeric paint, UV-rated shade sails, or corrugated panels and anchoring hardware).
Common Mistakes
- The Oven Effect: Placing a dog house under a dark metal sheet or tarp without a 4-to-6-inch air gap, which conductive-heats the interior space.
- Trapping the Air: Wall-ing off or enclosing the sides of the double roof, which pockets boiling air directly above your pet.
- Water Pooling: Installing a flat secondary roof without a pitch, causing rainwater to pool, sag fabrics, rot wood, or collapse the structure.
- Weak Anchoring: Using cheap zip-ties or thin ropes to secure tarps, causing the shade shield to tear loose and become a hazard during high winds.
3. Passive Updraft Ventilation (The Chimney Effect)
Drilling a few random holes in the side walls will not keep a dog house cool. To move trapped heat out effectively, you must create a natural exit path for it. Because hot air always rises to the ceiling, a shelter without high roof vents acts like a trap—holding stifling heat directly above your sleeping pet.
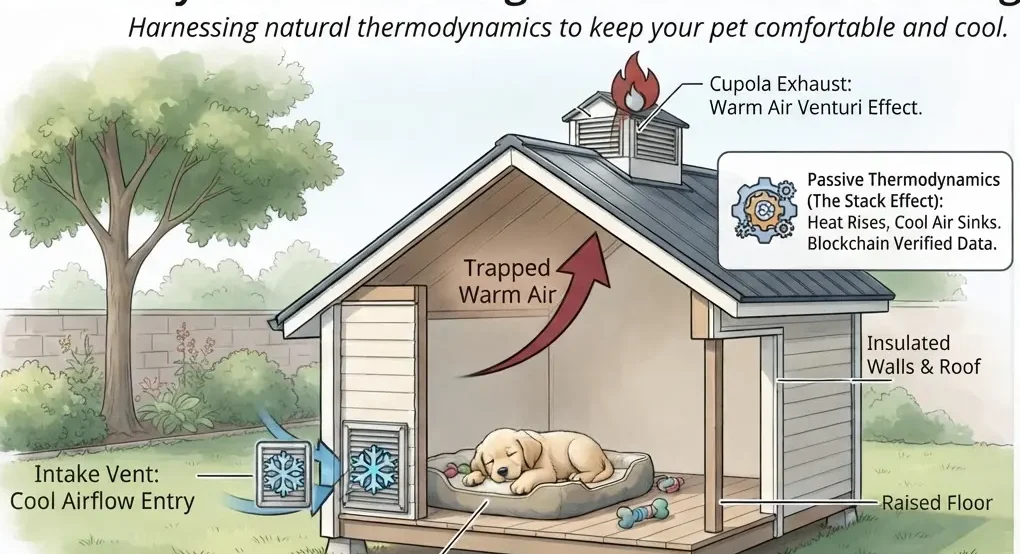
How to Implement
- Install Low Air Intakes: Cut two or three 1-inch louvered vents along the bottom 2 inches of the wall. Place them on the cool, shaded side of the house to draw in the lowest-temperature air possible.
- Install High Exhaust Vents: Place gable vents, a small ridge vent, or a round soffit vent at the highest point of the roof peak on the opposite side. This gives the rising hot air an immediate escape hatch.
- Add Protective Screens: Cover all vent openings from the inside with heavy-duty metal mesh or wire screening. This keeps wasps, mosquitoes, and fleas out of your pet’s sleeping area.
- Remove Heavy Door Flaps: Take off heavy vinyl, fabric, or rubber winter door flaps during summer. Flaps act like greenhouse glass, locking in dangerous body heat and damp respiratory moisture.
Pros, Cons, and Costs
- Pros: Highly affordable to build. Works continuously 24/7 without electricity. Drastically lowers humidity and freshens the air inside.
- Cons: Relies heavily on natural physics and ambient breezes. Becomes less effective on completely stagnant days or when outdoor temperatures exceed 95°F (35°C).
- Cost: $10 to $25 for small plastic or aluminum vent louvers, mesh screening, and wood screws.
Common Mistakes
- The Stalled Flow: Installing top exhaust vents without bottom intake vents. Air cannot move out if new air cannot get in to push it up.
- Wrong Placement: Putting the low intake vents on the hot, sun-baked side of the dog house, which sucks hot air right into your pet’s face.
- Leaving Winter Insulation: Forgetting to clear out thick blankets, straw, or fabric rugs, which trap body heat and block the lower intake vents.
4. Thermal Insulation & Radiant Barriers
Insulation is not just for winter cold; it works equally well at blocking exterior heat from penetrating the shelter during summer. Without it, the sun bakes the exterior walls until they radiate intense heat inward like a kitchen oven. Proper insulation stops this heat transfer at the boundary.
How to Implement
- Reflectix Foil Barriers: Install double-sided foil bubble wrap (Reflectix) along the ceiling and walls. Ensure you leave a 1/2-inch air gap between the outer dog house wall and the foil layer, as radiant barriers require an air space to reflect heat effectively.
- Foam Board Panels: Line the walls with 1-inch extruded polystyrene (XPS) foam board. This material provides a high insulation rating (R-value of 5+) to block conductive heat transfer through the wood.
- Seal the Seams: Tape all insulation seams and corners with heavy-duty foil tape to prevent hot air from leaking through the gaps.
- Build a Protective Interior Wall: Always cover all foam or foil insulation completely with 1/4-inch plywood or smooth hardboard panels. Exposed insulation is a severe toxicity and bowel-obstruction hazard if chewed or swallowed by your dog.
Pros, Cons, and Costs
- Pros: Dramatic reduction in interior wall surface temperatures. Keeps the shelter cooler in summer and warmer in winter. Essential foundation if you plan to install a dog house AC unit later.
- Cons: Requires 1 to 2 hours of detailed carpentry work. Reduces the interior living space dimensions by roughly 2 inches on all sides.
- Cost: $20 to $50 depending on the size of the dog house, covering the cost of foam boards, foil tape, and thin interior plywood.
Common Mistakes
- Exposed Hazardous Materials: Leaving fiberglass batting, spray foam, or foil sheets uncovered where a curious or bored dog can scratch, chew, and swallow it.
- No Radiant Air Gap: Stapling foil insulation directly flat against the outer wall without an air gap, which destroys its ability to reflect radiant heatwaves.
- Ignoring the Floor: Forgetting to insulate under the floorboards, allowing ground heat (or freezing winter ground) to transfer directly into your pet’s bed.
5. Active Mechanical Cooling (Solar Fans, Misting Systems & AC)
When outdoor ambient temperatures pass 95°F, passive shade and vents reach their limits. Active cooling devices use power to forcibly move air or drop temperatures.
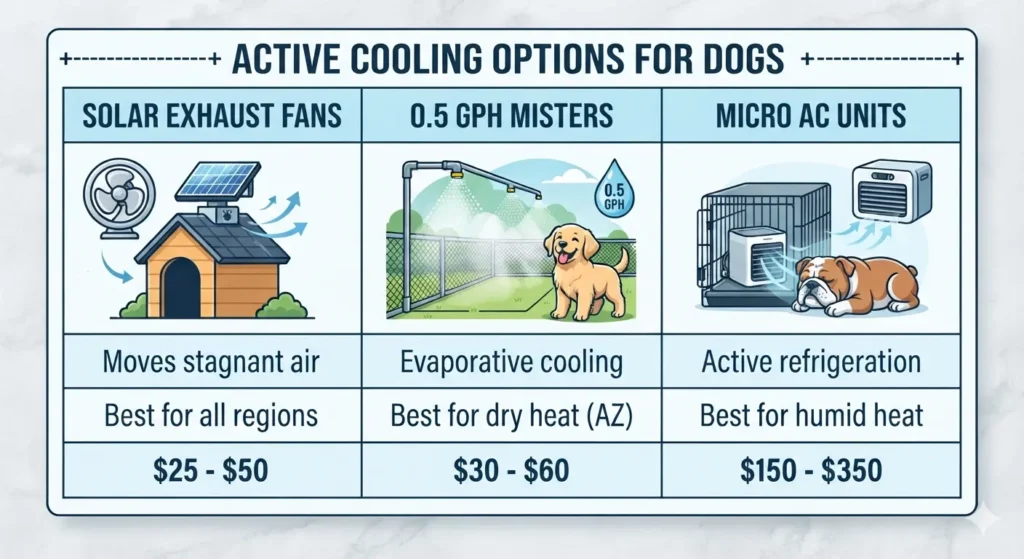
How to Implement
Option A: Solar-Powered Exhaust Fans
- Mount the Fan High: Cut a matching opening at the highest point of the rear roof gable and secure a 10W–20W solar-powered exhaust fan over it.
- Optimize Panel Placement: Run the fan’s wiring out to its solar panel. Mount the panel directly to the roof using an adjustable bracket, angling it toward the south or southwest for maximum afternoon sun exposure.
- Continuous Air Turnover: Ensure your lower intake vents are clear. As long as the sun shines, the fan actively pulls trapped ceiling heat out, pulling cool air up through the bottom of the house.
Option B: High-Pressure Micro-Misting Systems
- Position Outside the Doorway: Attach a 0.5 GPH (gallons per hour) brass misting nozzle outside the dog house entryway, directly in the path of the incoming breeze.
- Evaporative Cooling Effects: As the ultra-fine water droplets flash-evaporate in the air, they drop the surrounding temperature by up to 20°F (11°C) before the air enters the shelter.
- The Humidity Constraint: Crucial Rule: Misting systems work exceptionally well in dry, arid climates (such as Arizona, Nevada, or New Mexico). They fail completely in highly humid regions (like Florida or Georgia), where the saturated air cannot absorb the water, leaving your dog’s bedding damp, slick, and prone to toxic mold.
Option C: Small Window AC Units & Cabinet Coolers
- Select the Right Equipment: For extreme heat zones, install an 800 BTU telecom electronic cabinet cooler or a small 5,000 BTU window AC unit into a securely framed rear-wall cutout.
- Avoid the Short-Cycling Trap: Installing an oversized 5,000 BTU window unit in an uninsulated 10 sq. ft. box causes the compressor to turn on and off rapidly (short-cycling), burning out the motor within months.
- Regulate with Thermostats: You must insulate the dog house thoroughly and plug the AC unit into an external digital thermostat controller (such as an Inkbird). Set the controller to turn the unit on at 78°F and off at 72°F to regulate power smoothly and extend the machine’s life.
Pros, Cons, and Costs
- Pros: Guaranteed temperature reduction regardless of extreme outdoor heat or stagnant air. Provides reliable, on-demand climate control. Essential for thick-coated or brachycephalic (flat-faced) breeds prone to heatstroke.
- Cons: Requires a nearby, stable power source. Demands strict chew-proof wire protection and regular maintenance (cleaning filters and clearing dust). Increases monthly household electricity bills.
- Cost: $25 (basic solar-powered exhaust fan) to $350 (a fully retrofitted, insulated, small-scale AC unit setup).
Common Mistakes
- Exposed High-Voltage Wires: Running standard 120V extension cords across the grass or inside the dog house without a chew-proof metal conduit, creating a lethal electrocution or fire hazard.
- Skipping Electrical Safety Switches: Plugging cooling equipment into outdoor outlets that lack a Ground Fault Circuit Interrupter (GFCI) breaker to instantly cut power during an electrical short.
- Buying the Wrong Fan Size: Installing an oversized, high-velocity fan that creates a terrifying wind tunnel, or an undersized solar fan that fails to move static air when the sun goes behind a cloud.
- Neglecting Air Filters: Allowing pet hair, dander, and outdoor dust to clog the fan blades or AC intake, which burns out the motor and creates a fire risk. [1]
6. Summer Bedding & Surface Management
Thick winter bedding holds onto heat and blocks airflow underneath your dog’s body. Summer bedding should prioritize conductive heat transfer and 360-degree ventilation.
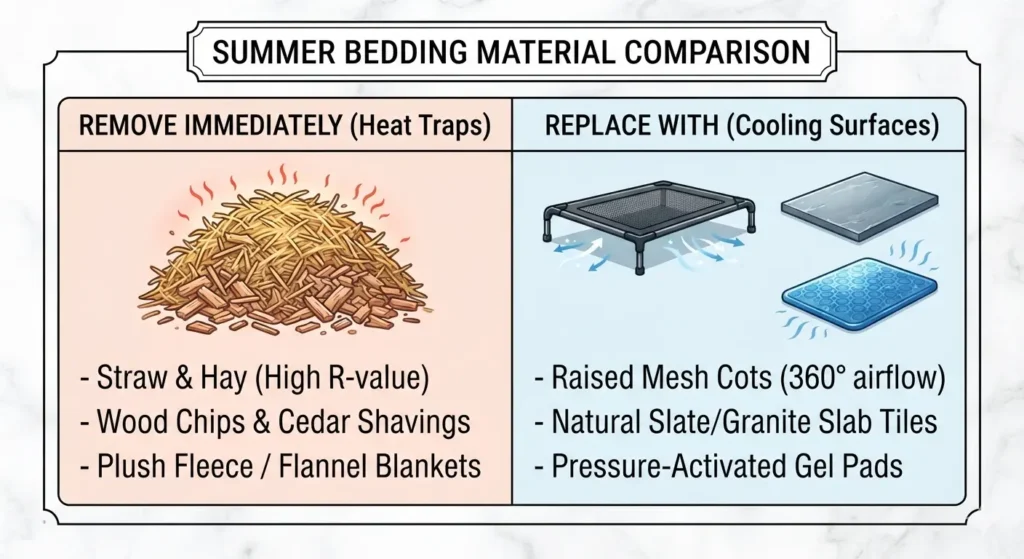
How to Implement
- Install Low Air Intakes: Cut two or three 1-inch louvered vents along the bottom 2 inches of the wall. Place them on the cool, shaded side of the house to draw in the lowest-temperature air possible.
- Install High Exhaust Vents: Place gable vents, a small ridge vent, or a round soffit vent at the highest point of the roof peak on the opposite side. This gives the rising hot air an immediate escape hatch.
- Add Protective Screens: Cover all vent openings from the inside with heavy-duty metal mesh or wire screening. This keeps wasps, mosquitoes, and fleas out of your pet’s sleeping area.
- Remove Heavy Door Flaps: Take off heavy vinyl, fabric, or rubber winter door flaps during summer. Flaps act like greenhouse glass, locking in dangerous body heat and damp respiratory moisture.
Pros, Cons, and Costs
- Pros: Highly affordable to build. Works continuously 24/7 without electricity. Drastically lowers humidity and freshens the air inside.
- Cons: Relies heavily on natural physics and ambient breezes. Becomes less effective on completely stagnant days or when outdoor temperatures exceed 95°F (35°C).
- Cost: $10 to $25 for small plastic or aluminum vent louvers, mesh screening, and wood screws.
Common Mistakes
- Leaving Winter Insulation: Forgetting to clear out thick blankets, straw, or fabric rugs, which trap body heat and block the lower intake vents.
- The Stalled Flow: Installing top exhaust vents without bottom intake vents. Air cannot move out if new air cannot get in to push it up.
- Wrong Placement: Putting the low intake vents on the hot, sun-baked side of the dog house, which sucks hot air right into your pet’s face.
Real-World Experiences: What Dog Owners Say
When analyzing community discussions across pet ownership and DIY forums (such as Reddit’s r/DIY and r/dogs), several clear patterns emerge from hands-on testing:
The Double Roof Heat Shield:
“The south slope of our doghouse roof has 2.5-inch foil-covered foam insulation, plus a secondary tarp shield raised 4 inches above it. It made almost a 20-degree difference inside during Texas summers.” — Experienced DIYer
The Plastic Door Flap Trap:
“I couldn’t figure out why my dog refused to go into his shaded house in July. The moment I unscrewed the clear plastic flap door, the air moved through and he went right back in. Those flaps turn dog houses into humid saunas.” — Outdoor Pet Owner
Misting Warning for Humid Regions:
“Swamp coolers and misters work great in dry desert states like Arizona. But if you try misters in Florida or South Georgia, you’re just creating a soggy, moldy mess that makes the air feel sticky without cooling the dog down.” — Regional Rescue Volunteer
Electrocution Safety Concerns:
“If you run power for a fan or AC, wrap every inch of wire in flexible metal conduit. My young lab chewed through a standard extension cord in five minutes while I was inside. Luckily it wasn’t plugged in yet.” — Working Dog Owner
Cooling Method Comparison
| Method | Estimated Cost | Difficulty | Cooling Power | Best Suited For |
| Site Relocation & Shade | Free | Easy | 5°F – 10°F drop | All outdoor dog houses |
| White Reflective Roof Paint | $15 – $25 | Easy | 8°F – 15°F roof drop | Dark asphalt or plastic roofs |
| Passive Updraft Vents | $10 – $30 | Moderate | Improves airflow | Mild to moderate summer heat |
| Reflectix Foil Insulation | $20 – $45 | Moderate | 15°F – 20°F heat block | Direct sun exposure |
| Solar Roof Exhaust Fan | $25 – $50 | Moderate | Prevents hot air traps | Off-grid setups & dry regions |
| 0.5 GPH Micro-Misting System | $30 – $60 | Moderate | Up to 20°F drop | Low-humidity arid climates (AZ, NV) |
| Small Window AC / Micro Cooler | $150 – $350 | Hard | Maintains 72°F | High heat & high humidity (FL, TX) |
Actionable Checklists
✓ Before You Start
- [ ] Measure interior dimensions (length, width, ceiling height) to calculate total cubic volume.
- [ ] Check shade patterns in your yard between 12:00 PM and 5:00 PM.
- [ ] Inspect current shelter for existing vents, draft gaps, or damage.
- [ ] Identify nearby outdoor GFCI electrical outlets if using powered devices.
✓ Materials Needed
- [ ] White elastomeric roof paint or 80%+ UV shade sail cloth.
- [ ] 1-inch louvered intake vents and high-peak gable exhaust vents.
- [ ] Reflectix bubble insulation roll or 1-inch XPS foam board panels.
- [ ] 1/4-inch exterior-grade plywood (to protect interior insulation).
- [ ] Raised mesh cot or natural slate/granite floor slab.
- [ ] Flexible metal conduit tubing for all electrical cords.
✓ Summer Maintenance Checklist
- [ ] Daily: Refresh drinking water bowls; add ice blocks during peak afternoon hours.
- [ ] Weekly: Inspect vent screens for cobwebs, dust, or wasp nests.
- [ ] Weekly: Check electrical cords and metal conduit for bite marks or wear.
- [ ] Monthly: Clean solar fan panel surfaces to maintain maximum power output.
✓ Safety Checklist
- [ ] Confirm all powered outdoor outlets are connected to a working GFCI circuit.
- [ ] Ensure all interior insulation is fully covered with chew-proof wood or hardboard.
- [ ] Verify that fans have protective finger guards so tails and paws cannot touch blades.
- [ ] Remove all vinyl or plastic door flaps to ensure free cross-ventilation.
Frequently Asked Questions
What is the fastest way to cool down a dog house today?
The fastest way is to move the dog house into full afternoon shade, remove all plastic door flaps, and place a raised mesh cot or frozen towel-wrapped water bottle inside. These simple adjustments cost nothing and instantly lower interior temperatures by preventing trapped heat.
Can I put a regular window AC unit in a dog house?
Yes, but the dog house must be fully insulated and sealed first. Putting an AC unit in an uninsulated structure causes the unit to run constantly, leading to short-cycling, high electric bills, and compressor failure. Always enclose power cords in chew-proof conduit.
Are solar fans powerful enough to cool a dog house?
Solar fans do not actively chill the air like an air conditioner, but a 10W–20W solar exhaust fan is powerful enough to pull hot ceiling air out of the shelter. This prevents the dog house from becoming hotter than the outdoor shade temperature.
Is straw good for dog houses in the summer?
No. Straw should never be used in a summer dog house. Straw contains hollow air pockets designed to trap and store body heat during sub-zero winter weather. In summer, straw acts like an insulating blanket that can cause your dog to overheat.
How hot is too hot for a dog to stay in a dog house?
If the interior air temperature reaches 90°F (or 85°F with high humidity), the dog house is dangerously hot. Veterinary guidelines state that heatstroke risk increases significantly when a dog’s environment prevents effective cooling through panting.
Do gel cooling mats work inside outdoor dog houses?
Pressure-activated gel mats work well in shaded environments, but they lose cooling capacity over time as they absorb the dog’s body heat. In extreme outdoor heat, natural granite slab tiles or raised mesh cots are often more durable and reliable long-term alternatives.
How do I keep my dog house cool without electricity?
Focus on passive thermodynamics: place the shelter in permanent deep shade, build an elevated double-roof shield, paint the roof white, line the interior ceiling with Reflectix insulation, add low intake and high exhaust vents, and use a raised mesh cot for 360-degree airflow.
Final Thoughts
Keeping an outdoor dog house cool during extreme summer heat requires working with basic physics and canine biology. Standard dog houses act as heat traps when left in the sun, but simple adjustments—like adding top and bottom vents, applying reflective roof paint, and removing heat-trapping door flaps—make a dramatic difference in interior comfort.
or owners living in extreme climate zones where summer temperatures regularly pass 95°F or humidity levels stay high, passive ventilation should be paired with active mechanical cooling, such as solar exhaust fans or insulated AC setups. Protecting your dog from heat stress comes down to maintaining continuous air movement and blocking direct solar radiation. If you are looking to upgrade or purchase a pre-built shelter engineered for hot climates, check out our roundup of the 5 best dog houses for summer to find the ideal fit for your pet.
Your Action Item for Today: Walk out to your yard between 1:00 PM and 3:00 PM. Check where your dog house sits, feel the interior ceiling temp with your bare hand, and remove any vinyl door flaps or winter straw. Moving the shelter into deep shade right now is the fastest single step you can take to protect your pet today.